Sunday, May 31, 2015

Internship Possibility

As of right now I don't have an internship, but in the beginning of May I was interviewed for one by the MNCPPC Arts and Cultural Heritage Division. The interview went fairly well despite it being a little informal (which isn't bad, I just didn't feel like I was talking to a stuffy business person). I was asked about myself, what I enjoyed doing, where I see myself in the future, and what I would like to accomplish with an internship.

After we were done with the interview we chatted a bit about art and sharing art with communities. I brought up my love for Art History somewhere in the conversation and that was when I was told to go check out the Brentwood Arts Exchange. So I did. There, I met the director and had a second, very impromptu, interview. Here I learned to always carry hard copies of my resume with me...

And now, here I am, still waiting to hear back from the MNCPPC.
Fingers crossed!

Since this post is boring, here is a picture of a painting I did last year for my boyfriend.
Studio Ghibli styled screencap from Princess Mononoke in acrylic paint.


Thursday, May 28, 2015

Wheel Throwing & Hand Building Projects

During my Spring 2015 semester I took a wheel throwing class for 8 weeks. I had taken the hand-building class during the previous semester and it was there I found out how much fun it was to work with clay. Wheel throwing wasn't on the same level of fun but it was an awesome experience.
First off, I am terrible at wheel throwing. Centering the clay is still beyond difficult for me. Centering is something that just takes practice, and lots of it. One day I'll get it right.
I'm more of a hand-builder anyway...
In the mean time, here is a short post about some of the pieces I threw (and some of the sculpture pieces I made for other classes).


This is one of the few cylinders I threw that was actually pretty close to being 100% centered. Right now it's about to be put into the kiln again (yesterday I was able to glaze it after it's first 50+ hours in the kiln).

Here are the other cylinders I made, and a horse from the hand-building class.


Obvious imperfections on the horse head but it's pretty cute. And it was my first time sculpting, along with the bust below (part of my Portrait and Figure Sculpting class).

It's special. 


Profile self-portrait.


This is a cat.


Tuesday, May 12, 2015

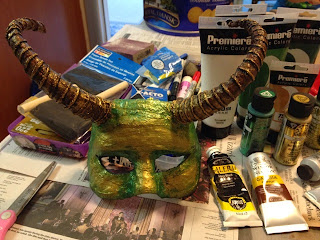
Whimsical Venetian Faun Mask

The inspiration for this particular mask came from the movie Pan's Labyrinth. In the movie, there is a character known as the faun. He's actually pretty creepy looking, but I found him quite enchanting. Here's a picture of how he is depicted in the movie.
 Kind of cool, right?

Anyway, I decided to make a half-mask with horns as my final project. Here is a link to the tutorial I used to help me with the plaster part of the mask: http://www.wikihow.com/Make-a-Plaster-Mask
It was very helpful!

But before I did any of the plastering, I made the horns first. I used a thick wire used for jewelry making as my base and wrapped tin foil around it. I kept adding more foil until I was happy with the thickness. Then, to keep the horns together, I used masking tape. 


All done with the horns for now.

The next part was to start making the actual mask. I used plaster strips found at my local craft store. This part is where the tutorial comes in handy. I called my best friends - Rachel and Stephanie - over to help me out. We decided to use Rachel as the model for the mask.
It was easier to have her lay down on the floor for easier clean up. Here are her selfies from her experience. (Use more Vaseline than you think is necessary. We learned the hard way. RIP Rachel's skin.)


"Is the pain over yet?"
It's over.
It took about 12 hours for the mask to feel completely dry. Once I felt it was dry enough I wet some more strips to place over the eye areas and around the edges. Since it was only 1-3 layers it took less time to dry, so I then went ahead and outlined what I wanted to cut off/out.

I used an exacto knife and a box cutter because I was too lazy to go out and buy carving tools. It took patience and literally an hour and a half to cut through all the plaster.

After sanding down the edges and putting gesso on the plaster, I tapped on the horns.

Once the horns were in place I put one more layer of plaster on the mask and all over the horns to make sure they would stay in place. Plaster dries pretty hard but it's very fragile. I had some cracks show up but I painted over them with modge podge.

For the horns to look like they were actually horns, I got the idea from a youtube video to use yarn as the grooves. You gently wrap the yarn around the horn and then paint on a layer of modge podge then let it dry. I used about 3 layers of modge podge to seal the yarn in place.


I let the mask sit overnight again to make sure the modge podge was dry. The next day I took out my paints and went to work. My idea was for this faun to be from an ancient forest, so the main colors I wanted to use were green, gold, and brown. Since it's a Venetian mask I simply had to use some glitter and jewels.


To make the horns appear aged, I sponged on metalic gold paint. Doing so made the grooves become highlighted. I used black paint under each groove to make them cast a shadow, adding more depth onto the horns. 

Here I drew thin lines with a gray marker. These lines are where I wanted to place my glitter. To do so I used a thin brush with modge podge and sprinkled the glitter over the design.


The jewels were stick on jewels bought from my local craft store. After they were in place I used modge podge yet again to seal them into place.


I decided I wanted to use feathers. I had bought a long strip of feathers sewn together and hot glued said strip onto the back of the mask. My intention was to have them fan out behind the mask but the feathers were so stiff. The only way they fan out is when the mask is being worn.


And that's it. Pretty easy~

·Who are you: name, major? Alisanna House, Fine Arts major.
·Why did you choose this project? After watching Pan's Labyrinth and being in total awe of the faun character, I thought "How cool would it be to make a mask with horns?" So basically, I wanted to do something with horns since I had never made anything with horns before. Or with plaster. 
·How much time did it take? Mmm...I think it took maybe 2 and a half weeks to make. I had to spread everything out because plaster doesn't dry quickly. 
·How much did it cost? I had to buy more green paint and I wanted to be adventurous with metallic paint so it came to about $45 in total. Glitter isn't as cheap as I thought, either.
·What was the biggest challenge? Sanding the plaster was hard. Trying to make the horns even in width and length was hard, too. Definitely trying not to hurt my friends face was a challenge. At least her eyebrows are safe.
·If you had it to do over, what would you do differently? More Vaseline! I also would make the eye shape more symmetrical and even. As i said in class, I think making the feathers by hand would be a fun thing to attempt. 


Wednesday, March 11, 2015

Kabuki Inspired Venetian Mask

There has always been a fascination with fantasy and mythology for me, especially when it revolves around Japanese myths. After the first project I already had the idea in my head to create a mask inspired by kabuki (Japanese theatre known for its unique style of drama and elaborate make-up) and Noh plays (another form of theatre that incorporates comedy and storytelling with the use of masks to convey certain characters and emotions). But instead of just recreating a mask I wanted to make a more “modern” version, meaning I wanted it to sparkle and look more like a Venetian mask. And I already had it in my head that I wanted to base my mask off of Japanese fox gods and demons, or kitsune.

So, after a bit of researching I came up with my plan. The three main colors I found on kabuki and noh masks were red, black, and white. I didn’t look into detail onto why those were the colors most often seen on the masks but I assume it might have something to do with being colors you can see from any distance as an audience member during a performance.

The first thing I did was go out to buy a plain half-mask and foam paper from the craft store. I wanted to exaggerate the size of the fox ears and I figured I’d need something stronger than poster board paper to hold the weight of paint. I also didn't want the ears to warp out of shape.
After getting the mask and other random materials, I began sketching out the ears on news print. Along with the ears I drew random triangle shapes to use for the cheeks and nose. Then I cute those out to use as templates. Here I tapped my shapes to the mask to give myself an idea of where I wanted everything to be placed.


Then I traced the newsprint templates onto poster board, cut those out, and glued them in place. Unfortunately, I used gorilla glue without knowing exactly how to use it and I ruined the first mask completely. The paper and foam kept falling off the mask even after it had dried completely. After hours and hours of waiting for the gorilla glue to dry it just didn't hold to the materials very well and I’m not sure why. I ended up having to scrap everything and begin again. But hey, trial and error!
Basically, don’t use any other glue except hot glue.


So I hot glued everything into place and painted gesso onto the mask. After letting the gesso dry, I took the templates I made for the area around the eyes and traced that onto the mask. From there I free handed everything else.

Because I have shaky hands I outlined my pencil marks with sharpies so that my messy painting wouldn't go outside the lines. I let each color I painted on dry completely before moving onto the next color. The paper on the sides curled in on itself because of the paint which I thought gave the mask a more dimensional feel.


To give the mask that “modern” look I was going for I layered the red stripes with red glitter glue and the black markings with iridescent glitter glue. I had black glitter glue but when it dried it looked like I hadn't even used glitter.

(Honestly, I just really wanted to use glitter…)


Once the front of the mask was dry I painted the inside of the mask white and after that side had dried I put a layer of glossy modge poge over the front and back.

Made a second one because why not. I like to think they are a reflection of each other.
The second mask has actual glitter paint on it instead of glitter glue.


·Who are you: name, major? Alisanna House, Fine Arts major.
·Why did you choose this project? I wanted to stay with the mask theme I have going on and I wanted to give my own spin on cultural masks.
·How much time did it take? Over 2 days and having to redo the first mask because of glue discrepancies I reached the minimum of 15 hours. This includes researching and sketches.
·How much did it cost? I already had most of the supplies I needed from the first project, so I think I spent about $20 in total this time.
·What was the biggest challenge? Getting the paper and foam to stay adhered to the mask was a challenge, and it really sucked to have to start over because of it.
·If you had it to do over, what would you do differently? If I had to do this over I would want to make the mask bigger, maybe sculpt out the facial features instead of using paper.